I used Nesco Spice Works Seasoning Kit Orginal, Teriyaki, and Hot-N-Spicy comes in the box. I used the Teriyaki for the Benison and the Buffalo Jerky.
Monday, December 26, 2011
Thursday, December 22, 2011
The History of Beef Jerky
Jerky was first introduced by the South American (Peru) native tribe called the Quechua (part of the ancient Inca Empire) in 1550. The product (Ch'arki), was boned and defatted meat (deer, elk, or buffalo) cut into slices and rubbed with salt. This meat was rolled up in the animal's hide for 10-12 hours and then sun dried or smoked over fires.
In South America, the Native Americans ate sun-dried venison and buffalo called tassajo, which was made with strips of meat dipped in maize flour, sun and wind dried, and then tightly rolled up into balls. North American Cree Indians mixed berries and suet (fat) with pounded cooked meat and pressed into concentrated small cakes to make pemmican.
Biltong came from pioneering South African forefathers who sun dried meat while traveling across the African subcontinent. Folklore has it that African tribesmen would place strips of venison under the saddles of their horses to tenderize and spice the meat! Seasoning became a blend of vinegar, salt, sugar, coriander and other spices.
The Indians and early settlers dried meat primarily from deer, elk or buffalo using salt, whatever spices they had and sun drying. As the Spanish arrived, the name evolved to charqui. Most travelers preferred to pound the charqui between large stones and boil it in water before eating. During ocean exploration and colonization, the Spanish sailors stocked the pacific islands with goats. What couldn't be eaten would then be cut into strips and hung in their ships to air dry. When the Spanish Conquistadors invaded the Americas, they were surprised to see the natives of North America drying meat as well. Soon, the natives adopted the Spanish term, Charqui, only adding their accent; the word "jerky" first came to be.
North American Pioneers would first dry meat by hanging it on the outside of their covered wagon sun drying (2-3 days). Another method was to build a scaffold over a slow fire and smoke the strips. While the heat and smoke would complete the process in half a day, the smoking method required a stopover; it wasn't long before awareness for disease and germs became prevalent and smoking became the norm.
Today jerky is made from thin strips of virtually any meat or from ground or chopped and formed meat. Manufacturers spice and dehydrate the product; some introduce smoke or using liquid smoke for flavoring.
Prices Rv Rentals Boise Braun 51s Decide Now Last Minute Fire Sentry Safe
Saturday, December 17, 2011
Beef Jerky fabricated in Home Oven
Homemade Beef Jerky in a home oven. I got the marinade off the internet somewhere. It has just the right amount of sweetness and spice. Yum.
Tuesday, December 13, 2011
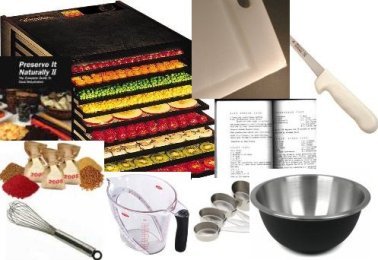
Jerky Making Kit Deluxe by Dad's Jerky has everything you need to prepare and dry beef, turkey, deer jerky, dried fruits and dried veggies right at home. The 9 Tray Deluxe Dehydrator by Excalubur has a thermostat it's Made in USA. See all of Dad's Jerky Products
!±8± Jerky Making Kit Deluxe by Dad's Jerky has everything you need to prepare and dry beef, turkey, deer jerky, dried fruits and dried veggies right at home. The 9 Tray Deluxe Dehydrator by Excalubur has a thermostat it's Made in USA. See all of Dad's Jerky Products
Rate :
 | Price : $429.99 | Post Date : Dec 13, 2011 11:45:54
Usually ships in 6-10 business days
The Dad's Jerky Deluxe Jerky making kit has everything you need to make beef jerky at home. You'll also dry your favorite fresh fruits and vegetables for healthy snack treats.These are the same commercial tools that the Dad's Jerky Company has been using to make the top quality jerky products for years. Everything you need is right here.The Deluxe Kit includes: The Excalibur 9 tray food dehydrator (Made in USA). This large capacity professional quality food dehydrator has 15 square feet of drying area that provides plenty of space for a variety of homemade beef jerky. Complete instructions on how to make beef jerky Crafts people and sportsman alike can make beef jerky, turkey jerky, fish jerky and dried fruits and vegetables fast and easy. Stainless steel 6 qt mixing bowl, 12" wisk and measuring cups.Large capacity measuring cup, Dexter chef's quality boning knife, 18" X 24" cutting board and complete instructions.Dad has even included some of his secret recipe seasoning mixes.The Preserve It Naturally book will show you how to prepare and dry fruit and vegetables as well as give you valuable information about choosing, marinating and storing your food.This is family fun for everybody. Enjoy!
Promotions Bed And Breakfast Geneva Shop Cross Stitch Wedding Samplers Best Prices Quiet Rowing Machine
Saturday, December 10, 2011
How to Make Sausage - Step-by-Step Instructions
Some people believe that making your own sausage is a complicated and daunting undertaking. But making your own sausage is easier than you might think. Here is a step-by-step guide that explains how you can make delicious homemade sausage in your own kitchen.
Though you may purchase ground meat from your local butcher or grocer, it's usually best to buy the cuts of meat you want to use to make sausage and grind it yourself. You may also be making sausage from cuts of deer meat (venison) or other wild game. The first step is to use a sharp knife to remove the meat from the bone, as well as any unwanted fat and any skin. Chop or slice up the meat you will be using into usable chunks for feeding into a meat grinder. Though you may be tempted to remove all of the fat, a great deal of sausage flavor comes from the fat, so leave a good portion of fat on the meat. Using a food scale, weigh out the appropriate batch weights according to the sausage recipe you are using. Grind each batch using the appropriate grinding plate for the type of sausage you are making. The grinding plates with smaller holes make finer ground meat, while the grinding plates with larger holes make a more coarse grind. If you will be using natural casings (hog casings, sheep casings, beef casings, or collagen casings), soak the casings in a bowl of cold water. After about 30 minutes, change the water and soak for another 30 minutes. Hold one end of the casing up to a tap and add some cold water. Now pinch off that end and slosh the water around inside the casing, working your way to the other end. Empty the water completely from the casing and collect in a bowl for use on stuffer. Measure out the seasonings according to the sausage recipe you are following or the instructions that came with the sausage seasoning mix you are using. Thoroughly mix the seasonings with the ground meat. It's easiest to use a meat mixer, but you can also wear plastic gloves and do the mixing by hand in a large mixing bowl. Before stuffing the sausage into casings, cook a little of the seasoned sausage in a small frying pan to test the flavor. Adjust the seasoning if necessary and repeat until seasoned to taste. If not stuffing, either make into patties by hand or with a patty maker or store in a meat storage freezer bags. Sausage is excellent to use as loose meat in recipes such as lasagna or anything requiring ground beef. Ground sausage meat certainly adds more flavor to a recipe instead of plain ground beef! Now you are ready to stuff the seasoned meat into the casings using a sausage stuffer. With a paper towel soaked with a little vegetable oil, coat the stuffer tube with oil. This makes putting on and taking off the casings easier. Close off the end of the casing with a metal clip, called a hog ring, cotton butcher twine, or just tie a knot into the casing itself. Using a sausage pricker, prick the end of the casing so that the trapped air can escape. Stuffing the sausage into the casings is much easier with two people. One person can control the sausage stuffer, passing the meat through the stuffer and into the casing. The second person can control the casing by moving the sausage along and monitoring air pockets that may form in the sausage. If any air pockets show up, just use the sausage pricker to release the air. When you reach a desired link length, twirl the link a couple of times to form a link. Continue stuffing until another link length has come out. Now turn this link a couple of turns the opposite direction as the first. This will keep the links from unraveling. If you go the same direction, you'll un-do the first sausage link. Alternatively, instead of making links right out of the sausage stuffer, the whole casing could be filled first and a closed off at both ends to make a long coil. It could be kept this way as a single coil, or the links could be made at this time. Just remember to always twirl the next link the opposite way. The links can also be tied off individually with hog rings or cotton butcher string. Place each coil on a large parchment paper lined tray. The sausage is now ready for smoking in a meat smoker, drying in a food dehydrator, cooking, or freezing. If you will be freezing the sausage, it's best to seal the sausage in a vacuum bag using a vacuum sealer to prolong the shelf life.
Who knew sausage making was so easy? Enjoy!
Wednesday, December 7, 2011
Barbecue Dry Rub Recipe for Pork by the BBQ Pit Boys
This is a classic Dry Rub recipe for pork ribs, butts, loins, and chops. Start with this recipe and then adjust the ingredients, spices, and quantities to make it your own special barbeque rub. Mix together 1/4 cup Paprika, 1/8 cup Fresh Ground Black Pepper, 1-2 tablespoons Garlic Powder, 1-2 tablespoons Onion Powder, 1 tablespoon or more Cayenne Pepper, 1/4 cup Coarse Salt. 1/4 cup Brown or White Sugar. Adjust quantities or add additional ingredients to make this your own secret barbecue dry rub recipe. Will lightly coat up to 6 lbs. Pork Ribs and 10 lbs. Pork Butt or Pork Roast. -BBQ Pit Boys You can print out this BBQ Pit Boys recipe at www.BBQPitBoys.com ---
Saturday, December 3, 2011
how to accomplish chinese 5 aroma beef jerky
chance and i demonstrate how to make some awesome beef jerky
Thursday, December 1, 2011
Lamb Recipes - How to Cook With Lamb
Of all the red meats lamb tends to be the sweetest, most succulent and less strong. Typically this is because lamb is generally slaughtered between 3 and 6 months of birth. However, in some instances lamb can have an unpleasant aftertaste due to the lanolin (the oil that protects the wool) being transferred onto the meat. However, this is very easy to remove if you rub the meat all over with a lemon or a lime, allow to marinate for 20 minutes then wash thoroughly under plenty of cold running water. Dry thoroughly and cook as you would normally.
Lamb is an extremely versatile meat and can be both cooked and used wherever beef would be used. There are also a whole range of recipes (typically originating from mountainous or Muslim countries where lamb is the meat of choice) that are specifically designed to be cooked with lamb.
Below are two classic lamb recipes:
Lamb Shanks with Chickpeas
Ingredients:
6 lamb shanks
220g cooked chickpeas (garbanzo beans)
1 large onion, sliced
4 cloves
2 bay leaves
1 tsp butter
1 tsp fresh rosemary, chopped
250ml lamb or beef stock
60ml red wine
2 tbsp tomato purée
6 garlic cloves, minced
110g flour
salt, black pepper and chilli flakes, to taste
Method:
Place the flour on a bowl, season lightly and dredge the lamb shanks in this. Melt the butter in a heavy frying pan and use to brown the lamb shanks all over. Transfer the lamb to a heat-proof casserole then use the frying pan to cook the onion and garlic for about 6 minutes. Then add the red wine to deglaze the pan. Add the remaining ingredients and bring to a boil. Season to taste then add to the casserole with the lamb shanks.
Cover the pot and cook in an oven pre-heated to 210°C and cook for about 60 minutes, or until the meat is tender and beginning to fall off the bone. Serve hot with herbed mashed potatoes.
Of course, you can't have a selection of lamb recipe without including a classic Welsh dish:
Welsh Lamb Stew
Ingredients:
2kg lamb shoulder, diced
olive oil
2l lamb stock
4 bay leaves
1 sprig rosemary
2 medium potatoes, coarsely diced
2 leeks, coarsely diced
Method:
Season the meat with salt and pepper. Add a little oil to a frying pan and use this to fry the lamb until nicely coloured. Add the stock and bring to a boil (skim-off any fat that raises to the surface). Now add the bay leaves and the rosemary and simmer for 20 minutes.
Add the potatoes and cook for 5 minutes before adding the remaining vegetables and cooking for a further 15 minutes. Serve hot, sprinkled with parsley and accompanied by warm, crusty, bread.
I hope you have enjoyed these classic lamb recipes and now want to find out more about the different methods of preparing lamb.
Subscribe to:
Comments (Atom)
|
|
|
|
|
 |
 |
 |
 |
 |
 |
 |
 |